Intro
If you are using VCarve to complete your CAM for either Big Red or the EBF, here are some of the many things you should check prior to running your project. Using a shared PC/VCarve can introduce changes to your file that you didn't intend which can do everything from make your project take a lot longer than expected to ruin your workpiece and endmills.
VCarve Job Setup Screen
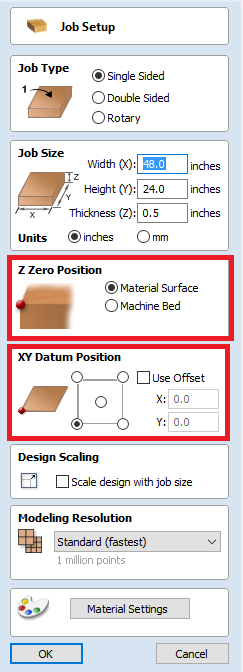
You see the Job Setup screen when you create a new file, but not when you open an existing file you created on a different machine then open on the shared computers with VCarve in Leesburg and Purcellville. To open the Job Setup screen after you open your project, click the icon below:
...
It's important to check that the "Z Zero Position" is set to "Material Surface" and that the "Use Offset" box in the "XY Datum Position" section IS NOT ticked, unless you really want to use offsets. For some reason, an offset added by a prior user can flow through to your project, even after the program is restarted.
Tool Settings
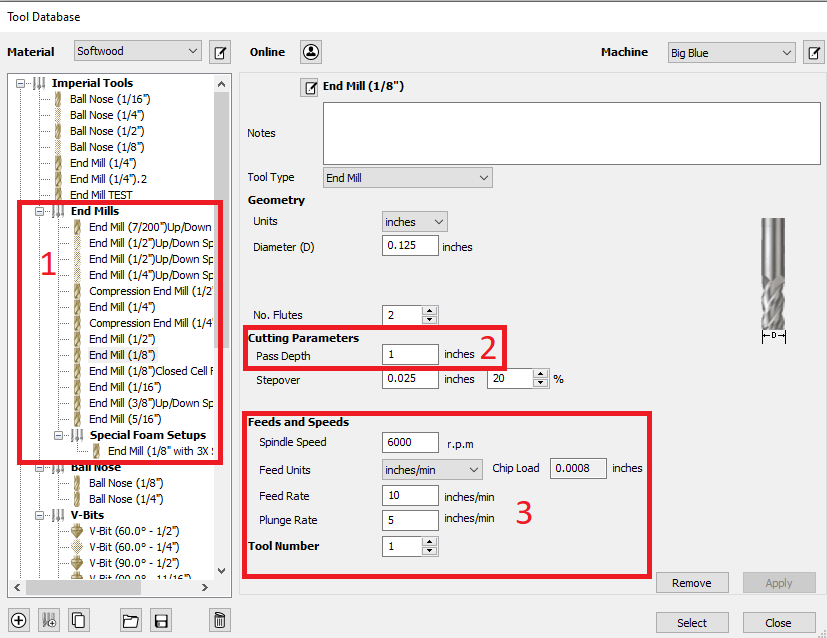
In theory, the feeds and speeds that you setup on your own computer should flow through to VCarve when you open your file on one of the shared computers. In practice, many of us do a little more work on our files when we get to the shared computer which can cause issues from settings others have put in. It's worth a quick check of all of your tool settings before you start. On each toolpath, click the "Edit..." button and check your settings.
...
Tool Number = Applicable to the EBF only. It is up to you to choose the tool numbers that correspond with which tools you plan to put in each tool holder slot. VCarve will usually show an error if you try to use two tools with different profiles with the same tool number.
Example Settings for 1/8 End Mill

Example Settings for 1/4 End Mill

Examples:
- Members have added lots of tools to the Tool Database and those tools may not have the same settings applied that you want to use. If you're editing your file on the shared machine, pick a tool you want to use, make sure to check all settings and don't assume that the tools has been setup the way you want to use it.
- For example, on the Purcellville computer's copy of VCarve, one of the "End Mill (1/8")" tools is setup to do a Pass Depth of 1" per pass, pretty much guaranteed to break the endmill the first time it tries to cut 1" deep through material like wood or plastic in one pass. However this tool may have been setup to cut foam where cutting 1" deep per pass is exactly what you want it to do.
- Check the feeds, speeds, plunge rate and tool number are correct. Again, on a shared machine, someone else may have set these attributes to cut a very different material than you are cutting.
Additional Job Settings
Before you cut your project, press the "Set..." button on the Toolpath menu.
...
- The "Clearance (Z1)" setting in the "Rapid Z Gaps above Material" setting determines how high the endmill moves above your workpiece between cuts. This needs to be high enough to clear any clamps, screws, or fixturing materials that stick up above the top of your workpiece. If you are using Big Red and you have clamps that stick up above your workpiece by 2", you want to make the "Clearance (Z1)" value over 2".
- The settings int he in the "Home / Start Position" section govern where the machine will move to before it starts cutting your project. In the example above, the machine will move to its X0 Y0 position first, then move to the first cut. Just like the "Clearance (Z1)" field above, the "Z Gap above Material" settings should be high enough to clear any clamps, screws, or fixturing materials that stick up above the top of your workpiece.