...
If you are bringing a file from another computer that you want to print, PDF files are recommended.
Printing from Microsoft Products
If you must print from a Microsoft Product...
- Create a custom page in your printer driver for the actual size you want the printout. For this example we will use 24" x 96" (2'x8').
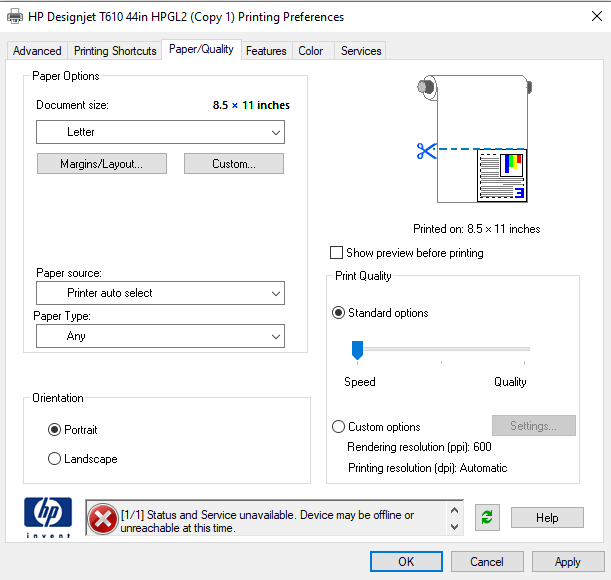 Image Added
- To do this go into Printers and Scanners/Click on the T610 and select Manage
- Select Printer Preferences and go to the Page/Quality tab
- You will see a custom Button, click that.
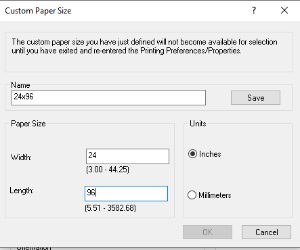 Image Added
- Enter a name of 24x96, Page Width will always be your smaller number, Page Height is your larger number
- Click SAVE and OK
- Now create additional custom sizes as determined by the process below.
- Now create a page that is only 48" (4') long and the other side would be proportional.
- Use the formula, 48 x <small size of desired> / <Length of desired>
- In our example it would be 48 * 24 / 96 = 12
- That is now the dimensions of the canvas that you will create on (12x48)
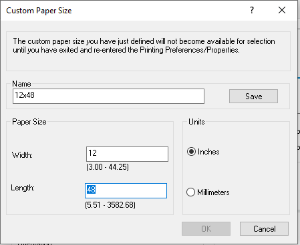 Image Added
- When you go to print, there is a Tab for Features
- Under Features select Print On
- Select your Desired print size (in our case 24x96)
- The printer will scale the print to the desired size
- As the print starts to come out of the printer, just do a quick measurement of the width to make sure everything is coming out ok.
Additional Example
- Let's say you want a poster that is 2' x 5'
- Now our formula is 48 * 24 / 60 = 19.2"
- Now our custom pages would look like these
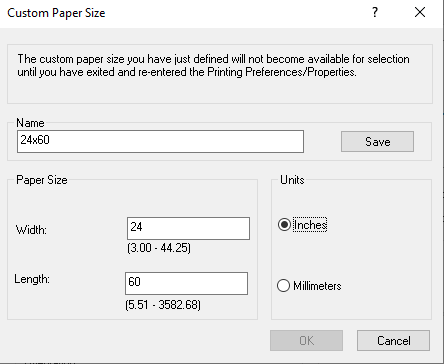 Image Added
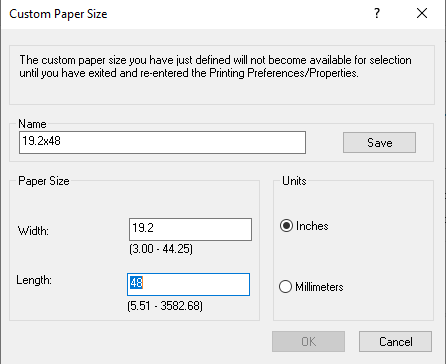 Image Added
- Remember to SAVE after entering each new page size.
- When you go back to the page size, at the very bottom you should see something like this
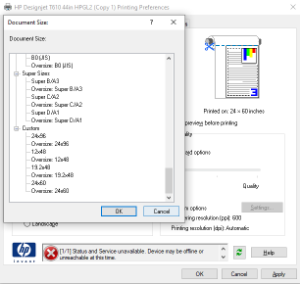 Image Added
Printing from a Laptop
To plot to the plotter from your own laptop, you will have to install the drivers below and plug the USB cable from the printer into your laptop. This can be complicated because the printer and the drivers are pretty old. It's MUCH easier to print directly from the desktop computer it is already connected to.
...
https://support.hp.com/us-en/product/hp-designjet-t610-printer-series/3339415/how-to
HP Support Files
| View file |
|---|
| name | HP Designjet Printers - Custom papers and PC3 files_ Limitations _ HP® Customer Support.pdf |
|---|
| height | 250 |
|---|
|
| View file |
|---|
| name | HP Designjet Printers - Improved performance for HP Colorfast Adhesive Vinyl _ HP® Customer Support.pdf |
|---|
| height | 250 |
|---|
|
| View file |
|---|
| name | HP DesignJet Series - How To View The Endless Roll Option In The Plotter Driver Application Page Size _ HP® Customer Support.pdf |
|---|
| height | 250 |
|---|
|
| View file |
|---|
| name | HP Designjet T610 Printer Series - Load a roll into the 44-inch printer _ HP® Customer Support.pdf |
|---|
| height | 250 |
|---|
|
| View file |
|---|
| name | HP Designjet T610 Printer Series - Load a roll onto the 44-inch spindle _ HP® Customer Support.pdf |
|---|
| height | 250 |
|---|
|
| View file |
|---|
| name | HP Designjets - Change Print Settings (Windows 10) _ HP® Customer Support.pdf |
|---|
| height | 250 |
|---|
|
Microsoft Products Workaround
If you must print from a Microsoft Product...
- Create a custom page in your printer driver for the actual size you want the printout. For this example we will use 24" x 96" (2'x8').
- Image Removed
- To do this go into Printers and Scanners/Click on the T610 and select Manage
- Select Printer Preferences and go to the Page/Quality tab
- You will see a custom Button, click that.
- Image Removed
- Enter a name of 24x96, Page Width will always be your smaller number, Page Height is your larger number
- Click SAVE and OK
- Now create additional custom sizes as determined by the process below.
- Now create a page that is only 48" (4') long and the other side would be proportional.
- Use the formula, 48 x <small size of desired> / <Length of desired>
- In our example it would be 48 * 24 / 96 = 12
- That is now the dimensions of the canvas that you will create on (12x48)
- Image Removed
- When you go to print, there is a Tab for Features
- Under Features select Print On
- Select your Desired print size (in our case 24x96)
- The printer will scale the print to the desired size
- As the print starts to come out of the printer, just do a quick measurement of the width to make sure everything is coming out ok.
Additional Example
...