Paper Types and Loading
Changing the paper can be finicky and take more than one try.
To remove the existing paper roll:
- Lift the blue lever on the top left (facing) the machine. This releases the paper.
- From the back of the machine, roll the paper back until it is removed from the feed slot. The plotter will then recognize that it doesn't have paper.
- You can then lift the roll and bar, starting with the right side, followed by the left side.
- Pull the blue plastic endcap off the paper roll.
- Remove the paper roll from the feed bar.
Loading a new roll
- Put the new paper roll onto the bar.
- Push the blue plastic endcap on to the end of the bar so that it slots inside of the paper roll.
- Most rolls have a 2" core. If you are using a 3" core paper, there are adapters near the ink on the left side (facing front) of the plotter.
- Place the left side of the bar into the back of the plotter, followed by the right side (facing the back of the printer).
- The paper should be setup so that the paper is exposed at the top of the roll - side view:
- Feed the paper into the back of the printer slowly. The printer will grab the paper and a dialogue will start on the LCD screen on the front of the unit.
- Once the paper loads, it will confirm the paper type. If you have put in a different type, make sure to select that paper from the list. It makes a big difference in performance and smearing of your print.
Inks
If an ink bottle is low, there are additional ink bottles in the grey cabinet, closest to the television. There are 6 colors of ink:
- Cyan
- Magenta
- Yellow
- Gloss/Photo Black
- Matte Black
- Grey/Light Black
The ink reservoirs are on the left side of the printer as you are facing it. They don't need to be completely full, but if one looks low, you can top them up using the ink bottles from the cabinet. Just remove the plug at the top of the reservoir and add ink. It is suggested that you wear gloves to avoid getting ink on your hands as it will stain your hands and anything else it touches.
| Reservoir Label | Ink Bottle Label |
|---|---|
| Cyan | Cyan |
| Magenta | Magenta |
| Yellow | Yellow |
| Light Black | Grey or Light Black |
| Matte Black | MK Black (sometimes this is a sticker on the bottle), Matte Black |
| Black | Black, Gloss Black, Photo Black |
Printing from the Purcellville Desktop Computer
The plotter was moved so that it could be hooked up directly to the Makersmiths desktop computer in Purcellville, hopefully eliminating a lot of the driver installation and setup issues that people were having. A summary of the steps to print from Inkscape, though the same steps can be applied to print from any other application, are available below. For ease of printing, it is suggested that you setup your image in a design application so that it is exactly the size you want, or print from a correctly sized PDF.
If you are bringing a file from another computer that you want to print, PDF files are recommended.
Printing from a Laptop
To plot to the plotter from your own laptop, you will have to install the drivers below and plug the USB cable from the printer into your laptop. This can be complicated because the printer and the drivers are pretty old. It's MUCH easier to print directly from the desktop computer it is already connected to.
Drivers
hpdjt1100serieswx64gl.exe - Driver Software (Yes, the 1100 and 610 use the same driver)
HPInstantPrintingApp.exe - Easy App for printing to the plotter.
Driver Download from HP
https://support.hp.com/us-en/drivers/selfservice/hp-designjet-t610-printer-series/3339415
You will also want the HP Instant Print software. It makes printing Certain files very easy. (PDF or image formats)
Microsoft Products WARNING: I am a big fan of Microsoft Publisher, but when you print from any Microsoft product you will be limited to about 4 feet, sometimes less. I don't know why, but it has always been the case. To get around this Look at the procedure at the bottom of this page.
HP Site for Information
https://support.hp.com/us-en/product/hp-designjet-t610-printer-series/3339415/how-to
HP Support Files
Microsoft Products Workaround
If you must print from a Microsoft Product...
- Create a custom page in your printer driver for the actual size you want the printout. For this example we will use 24" x 96" (2'x8').
- To do this go into Printers and Scanners/Click on the T610 and select Manage
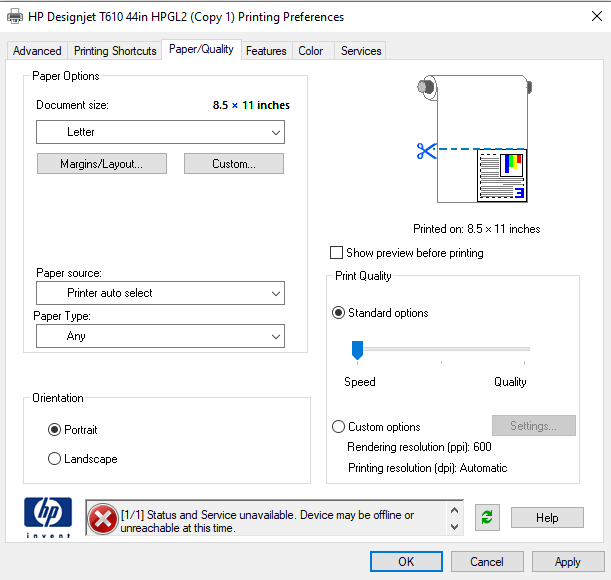
- Select Printer Preferences and go to the Page/Quality tab
- You will see a custom Button, click that.
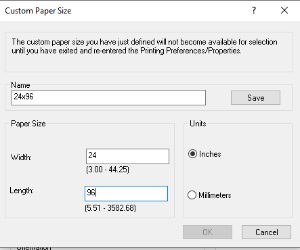
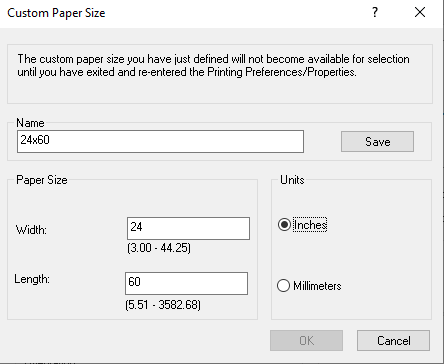
- Enter a name of 24x96, Page Width will always be your smaller number, Page Height is your larger number
- Click SAVE and OK
- Now create additional custom sizes as determined by the process below.
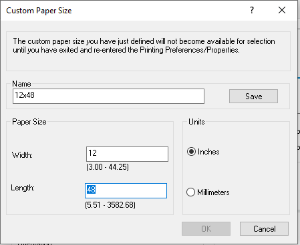
- Now create a page that is only 48" (4') long and the other side would be proportional.
- Use the formula, 48 x <small size of desired> / <Length of desired>
- In our example it would be 48 * 24 / 96 = 12
- That is now the dimensions of the canvas that you will create on (12x48)
- When you go to print, there is a Tab for Features
- Under Features select Print On
- Select your Desired print size (in our case 24x96)
- The printer will scale the print to the desired size
- As the print starts to come out of the printer, just do a quick measurement of the width to make sure everything is coming out ok.
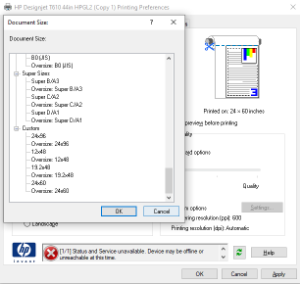
Additional Example
- Let's say you want a poster that is 2' x 5'
- Now our formula is 48 * 24 / 60 = 19.2"
- Now our custom pages would look like these
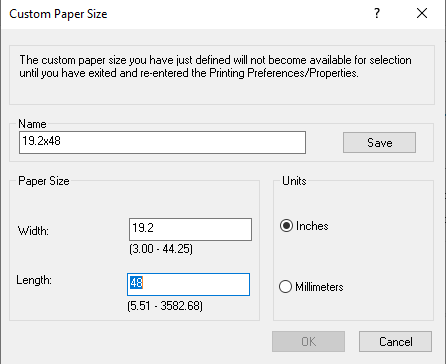
- Remember to SAVE after entering each new page size.
- When you go back to the page size, at the very bottom you should see something like this